Argghhhhhh.... this is my second try a this post. I was almost finished when I hit something and EVERY SINGLE WORD disappeared! And I had been quite chatty and creative... darn, hope I can remember at least some of it.
Sooooo, where have I been the last week and half? Well I've been shopping and it wasn't nearly as much fun as I imagined. In fact it was quite nerve wracking. So many decisions to make. I've looked at lighting fixtures, ceiling fans, faucets, paint, tile, front doors, drapes, rugs, furniture and appliances. Boy are appliances expensive! The first place I got prices at was Sears, and I must have "sucker" written on my forehead because by the time the salesman got done with me the total topped $10,000. Not gonna happen. I want nice appliances but that is too much. The kitchen is only 8' X 10' and the thing I like to make most for dinner is a reservation. I have 6 different pizzeria numbers in my cell phone! LOL! So I went to at least another 5 stores and finally got the appliances purchased. My list got severely shortened from all the things I thought I needed at Sears, and I ended up with a nice French door refrigerator, an electric stove with a smooth cooktop and a dishwasher. I spent less than half what Sears quoted and I feel quite virtuous.
The demolition on the kitchen has begun but I thought you might like to see it in its original state - and I do mean original. Here is a picture looking into the kitchen from the living room. Notice how the refrigerator sticks out at least 6 inches into the doorway.
Squeeze past the fridge and step into my kitchen and into 1953. Now those cabinets may have been refaced in the 70's but the counter and the tile on the walls has been untouched since 1953.
See that little bit of counter space to the left of the sink? That is ALL the counter space in the entire kitchen. And those cabinets... yep that is all the cabinetry there was.
Now lets turn to the left and gaze upon the appliances.
Isn't that stove quite the specimen? That is a 1964 Frigidaire Flair stove. It was state of the art. Remember the TV show Bewitched? Samantha had the same stove in her "modern" kitchen.
You push down on a little button by the handle on the front and give it a good pull and the cover slides back and the burners come forward. There are some kind of hydraulics in the doors of the 2 ovens and they open upward. Now both of the ovens and 3 of the 4 burners still work! How many of the appliances I bought this week do you think will still be working in 49 years? Yeah, my guess is none of them too. I thought about keeping this stove and incorporating it into a funky retro kitchen but I'm afraid if I do that it will quit working in about 6 months and I'll have to totally redo my renovation. I'm not taking that chance.
So the demolition has commenced and it has been a lot of work. There was ceramic tile on the walls that went from the floor to a little past the window ledges. It was set in concrete on a wire lathe and it did not want to come off. My son's kitchen has the same tile and they reglazed it but we are changing too much to salvage it. Here's how it looks today - the wall where the appliances were...
and the wall where the sink, countertop and cabinets were. GONE!!!!
Now it will be a while before I can show some "after" pictures. Tom, my contractor, is trying to finish up the house around the corner in the next 2 weeks and he has to do another kitchen remodel before he can finish mine up. I keep telling myself it will be August before this is finished. However there has been other work done in the house. They have reframed the closet in my bedroom. They removed the huge heavy sliding doors that wouldn't stay on the track and are going to put up nice bi-fold doors. They've spackled the cracks and sanded the plaster and started painting and walls and the woodwork. I'm very happy with my color choices. They look even better on the wall than they did in the store. They took up the carpet in a couple of rooms and the hardwood underneath looks great. It is going to need minimal refinishing - yeah! In the basement where my studio will be they have worked on framing the walls and the bathroom and have worked out how to close off the laundry area and the furnace area. It is going to be nice.
Next week I'll tell you about the furniture/drapes/rug shopping. I have a new found respect for interior designers. I want it to look like "me" so I'm not getting everything from one place. I've shopped IKEA, Pier 1, Front Room Furnishings, Penneys, Target and Bed, Bath and Beyond to name a few stores I've been in. I know it won't come as a surprise to you that I have incorporated a bit of yellow into every single room! Even the living room/dining room which is several shades of khaki - I think it is going to look great.
So I hope to get a bit of sewing done tomorrow. I have several quilts back from the long arm gals and I'd like to get the binding on a couple of them so I can have something to take to Show n Tell at the quilt guild meeting on Monday night.
Happy stitching-
carol fun
Saturday, June 1, 2013
My entries for the Pooling Sock Yarn Challenge
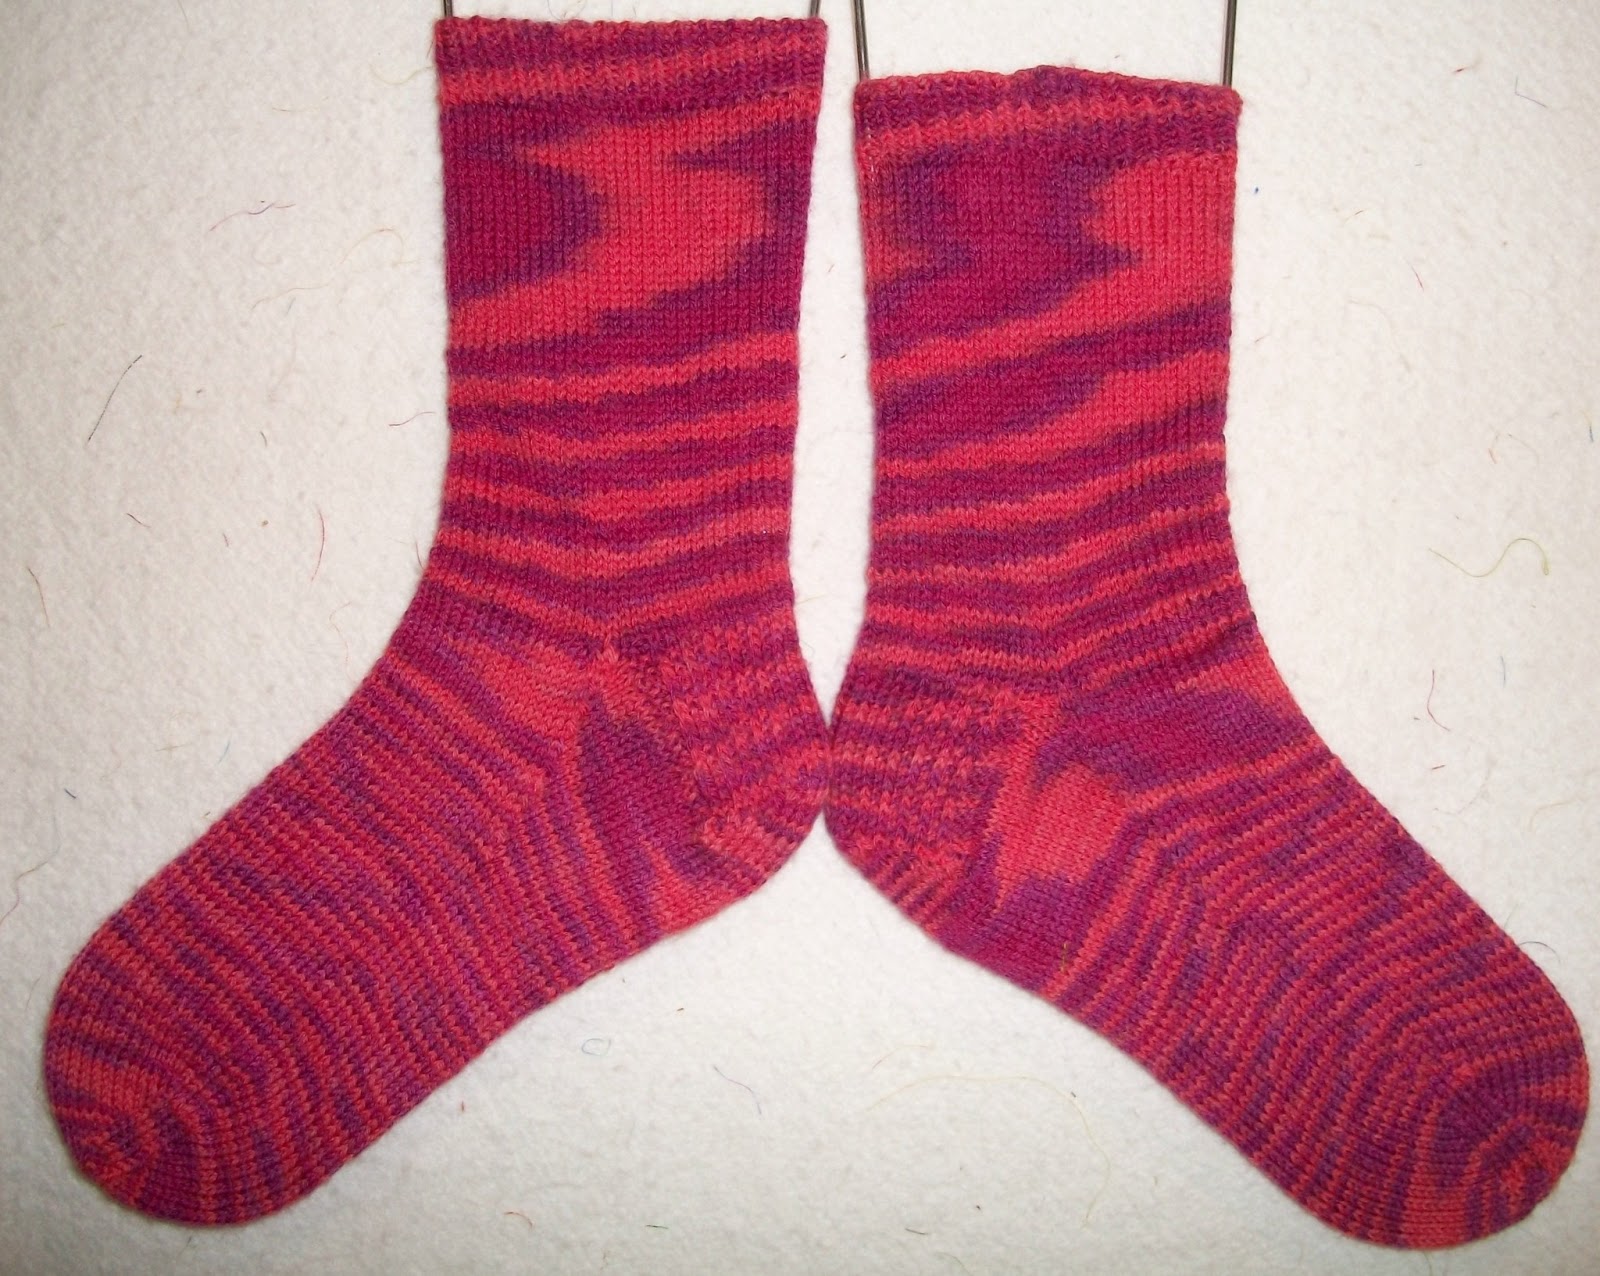
So what have I been up to besides no good, well I've been knitting socks. Socks with fun pooling yarns. I just LOVE LOVE LOVE pooling sock yarn and I cannot get enough of it as my stash will attest to. Here are my entries for Judy L's Pooling Sock Yarn Challenge on the Patchwork Times blog.
This is the first pair I finished and this is my favorite pair of the trio. It is a Opal Antonia Hand Dyed Sock yarn. I love the colors in this skein and the amazing way they pooled.
The second pair I finished is another Opal Antonia Sock Hand Dyed yarn. I referred to these as the Transportation socks since that orange is the same shade as the double yellow line that they paint on the roads. Quite intense.
And this third pair is from the Schoppel Cat Prints Hand Dyed Collection of yarn. It said it would pool and while they started out pooling, they quickly turned into swirling and then after the heel turn they melted into mush. I like the color combo - raspberry and rose and the "S" that appeared by the cuffs is kinda cool.
All three pairs of these socks was knitted with 62 stitches using the same set of 2.75mm circular needles with the Magic Loop method - my favorite way to knit socks. And I swear I'm going to buy me a pair of Birkenstocks and wear my socks with them and show them off - LOL! My sons will soon refuse to be seen in public with me -- crazy lady!
As for my adventures in house renovation and marathon shopping - check back later and I'll give you an update. It has been quite the experience.
Don't forget to check out the other entries here. There are some gorgeous pooling yarn socks to see!
Happy knitting-
carol fun
This is the first pair I finished and this is my favorite pair of the trio. It is a Opal Antonia Hand Dyed Sock yarn. I love the colors in this skein and the amazing way they pooled.
The second pair I finished is another Opal Antonia Sock Hand Dyed yarn. I referred to these as the Transportation socks since that orange is the same shade as the double yellow line that they paint on the roads. Quite intense.
And this third pair is from the Schoppel Cat Prints Hand Dyed Collection of yarn. It said it would pool and while they started out pooling, they quickly turned into swirling and then after the heel turn they melted into mush. I like the color combo - raspberry and rose and the "S" that appeared by the cuffs is kinda cool.
All three pairs of these socks was knitted with 62 stitches using the same set of 2.75mm circular needles with the Magic Loop method - my favorite way to knit socks. And I swear I'm going to buy me a pair of Birkenstocks and wear my socks with them and show them off - LOL! My sons will soon refuse to be seen in public with me -- crazy lady!
Don't forget to check out the other entries here. There are some gorgeous pooling yarn socks to see!
Happy knitting-
carol fun
Wednesday, May 22, 2013
So much to do ... and none of it involves fabric...yet
Well last week certainly flew by as I spent most of my time doing stuff that didn't involve fabric or yarn or thread. It did involve paint, lighting fixtures, appliances, tile, cabinets and lots of other decisions that need to be made regarding this.... my new house.
My little yellow house! It makes me happy! Now the house was built in 1953 which was a very very good year. How do I know this? Well I was born in 1953 - enough said - LOL! This little house has 3 bedrooms and 2 bathrooms and a basement that is going to be a dynamite sewing studio. Notice the syntax in that last sentence - the sewing room is "going" to be dynamite. It looked like this when I purchased the house.
View as you enter coming down the stairs-
View when you are in the room looking back toward the stairs-
Isn't that tile something? My son thinks they were trying for an Ohio State motif... perhaps.. but its not our college and it has to go! The room measures 13 feet wide and 32 feet in length which feels like a lot of space to me.
Here is how the space looks today.
Amazing how much demolition was accomplished in just one day. My contractor, Tom, hopes to have this spaced framed in and dry walled by next week. That is my hope too. Till then imagine a laminate wood floor and lovely light yellow walls. The color I chose is a Sherwin Williams paint and no joke - the color is called Glad Yellow - how apropos! I'm sure I will be very glad in this yellow sewing studio.
This is just the beginning of this total house renovation. Every room will be painted. The wall to wall carpet on the first floor will be removed and the hardwood floors refinished. The basement bathroom will have the shower redone and a sink added and a new tile floor. The upstairs bathroom will have the wall tile reglazed, a new tile floor, a new toilet and the vanity repainted. All the lighting fixtures in the house will be replaced and ceiling fans added in the bedrooms and the kitchen. The kitchen will be totally completely gutted and a brand new kitchen will be created. And that's just what I can remember at the moment. I have to make decisions about all of this stuff -- yikes!!!! It is fun and nerve wracking.
I plan to share pictures and stories as I move through this adventure. My contractor is the same one who renovated my son's house a year ago. I bought this house for many reasons, one of which was its location close to my son. Our houses are only 2 short blocks apart - you can walk from one house to the other in about 3 minutes - perfect. Now the plan is that all this work should take about 6 weeks but I know that it is going to be longer than that since my contractor is squeezing in this job while he's in the throes of renovating another house in the neighborhood, and he promised another client a kitchen remodel which he has to get to before he'll be able to do mine. I'm okay with that. I'd love for my house to be finished tomorrow, but it is unrealistic and if I was the other client with the kitchen remodel I wouldn't be happy with someone else getting in line in front of me. As it is the contractor is juggling a lot of balls and I'm just thrilled to see some, heck any progress on my house.
I know this project will have ups and downs and I'm keeping my sights set on a completion of the whole renovation at the end of the summer. You have to check back and see the "before" pictures of the kitchen. It has been virtually untouched since 1953!
Happy stitching-
carol fun
My little yellow house! It makes me happy! Now the house was built in 1953 which was a very very good year. How do I know this? Well I was born in 1953 - enough said - LOL! This little house has 3 bedrooms and 2 bathrooms and a basement that is going to be a dynamite sewing studio. Notice the syntax in that last sentence - the sewing room is "going" to be dynamite. It looked like this when I purchased the house.
View as you enter coming down the stairs-
View when you are in the room looking back toward the stairs-
Isn't that tile something? My son thinks they were trying for an Ohio State motif... perhaps.. but its not our college and it has to go! The room measures 13 feet wide and 32 feet in length which feels like a lot of space to me.
Here is how the space looks today.
Amazing how much demolition was accomplished in just one day. My contractor, Tom, hopes to have this spaced framed in and dry walled by next week. That is my hope too. Till then imagine a laminate wood floor and lovely light yellow walls. The color I chose is a Sherwin Williams paint and no joke - the color is called Glad Yellow - how apropos! I'm sure I will be very glad in this yellow sewing studio.
This is just the beginning of this total house renovation. Every room will be painted. The wall to wall carpet on the first floor will be removed and the hardwood floors refinished. The basement bathroom will have the shower redone and a sink added and a new tile floor. The upstairs bathroom will have the wall tile reglazed, a new tile floor, a new toilet and the vanity repainted. All the lighting fixtures in the house will be replaced and ceiling fans added in the bedrooms and the kitchen. The kitchen will be totally completely gutted and a brand new kitchen will be created. And that's just what I can remember at the moment. I have to make decisions about all of this stuff -- yikes!!!! It is fun and nerve wracking.
I plan to share pictures and stories as I move through this adventure. My contractor is the same one who renovated my son's house a year ago. I bought this house for many reasons, one of which was its location close to my son. Our houses are only 2 short blocks apart - you can walk from one house to the other in about 3 minutes - perfect. Now the plan is that all this work should take about 6 weeks but I know that it is going to be longer than that since my contractor is squeezing in this job while he's in the throes of renovating another house in the neighborhood, and he promised another client a kitchen remodel which he has to get to before he'll be able to do mine. I'm okay with that. I'd love for my house to be finished tomorrow, but it is unrealistic and if I was the other client with the kitchen remodel I wouldn't be happy with someone else getting in line in front of me. As it is the contractor is juggling a lot of balls and I'm just thrilled to see some, heck any progress on my house.
I know this project will have ups and downs and I'm keeping my sights set on a completion of the whole renovation at the end of the summer. You have to check back and see the "before" pictures of the kitchen. It has been virtually untouched since 1953!
Happy stitching-
carol fun
Monday, May 20, 2013
Blogger's Quilt Festival - Spring 2013
Well I've been thinking and thinking and thinking about which quilt I wanted to enter in this edition of the Blogger's Quilt Festival, and I finally decided on this one which I call Millennium Stars. (This picture looks way better if you click on it and make it larger - I really think you'll be surprised what a difference it makes.)
This is a very generous queen size quilt and it was impossible to get a good picture of in indoors so I hauled it out of my son's house when he wasn't there (he really shouldn't have given me keys -LOL) and "posed" it on his front lawn. Now it isn't a whole lot brighter on the lawn since his little house is completely dwarfed by a gigantic oak tree, but by standing on his front porch wall and hanging onto the brick corner post I was able to get it all in the picture. When my son saw these photos he asked how I got them and ummmm, I told him. He shook his head and mumbled "crazy lady".... he knows me too well.
Here's another "pose" that has my youngest son hiding behind the quilt. I'm afraid that he too was mumbling "crazy lady" as he stood there.
Anyway, every single star in this quilt is a different print that has some sort of metallic on it -silver, gold or copper - there are 111 stars. I played with the colors so that they flow outward from a light center to the darker edges. The sawtooth border is made from the same fabrics as in the blocks.
This quilt was a long long time in the making. I started it over 10 years ago and it languished half quilted for about a decade. When my oldest son bought his house he wanted a quilt for his bedroom. One afternoon I was cleaning out a corner of my sewing room and found this quilt stuffed in a laundry basket. I had totally forgotten it existed. I loved the top but hated the quilting I had put in it. My son saw it and asked if I had any plans for this quilt as he really liked it. Whoa... that was a surprise. So for a couple of days I debated whether to continue with the machine quilting I had done (just boring in the ditch) or should I take out all my quilting and send it off to my long arm gal, Cass. Well you can see from the following close ups I unsewed it and send it off and she did a wonderful job. I had no idea what color to do the quilting in and Cass choose a soft gray which really complements all the different fabrics.
Here are some of the light gold blocks from the center of the quilt -
and some of the rosy purples...
and some of the deep blues...
and the block that gives this quilt it's name...
This is fabric from the Millennium year 2000 - I'm glad I finally got this finished. It certainly made a lovely quilt in my opinion. My son says it looks like the quilt was custom made for his bedroom which is a deep blue. Since I started this quilt over a decade ago, this would make me quite prescient. Too bad I didn't have the vision to buy Apple stock too - LOL!
Thanks for stopping by and looking at my entry in the Bed Quilt category. I hope that all of you enjoy the Bloggers' Quilt Festival as much as I do. So many talented quilters who generously share their creativity.
Happy stitching-
carol fun
This is a very generous queen size quilt and it was impossible to get a good picture of in indoors so I hauled it out of my son's house when he wasn't there (he really shouldn't have given me keys -LOL) and "posed" it on his front lawn. Now it isn't a whole lot brighter on the lawn since his little house is completely dwarfed by a gigantic oak tree, but by standing on his front porch wall and hanging onto the brick corner post I was able to get it all in the picture. When my son saw these photos he asked how I got them and ummmm, I told him. He shook his head and mumbled "crazy lady".... he knows me too well.
Here's another "pose" that has my youngest son hiding behind the quilt. I'm afraid that he too was mumbling "crazy lady" as he stood there.
Anyway, every single star in this quilt is a different print that has some sort of metallic on it -silver, gold or copper - there are 111 stars. I played with the colors so that they flow outward from a light center to the darker edges. The sawtooth border is made from the same fabrics as in the blocks.
This quilt was a long long time in the making. I started it over 10 years ago and it languished half quilted for about a decade. When my oldest son bought his house he wanted a quilt for his bedroom. One afternoon I was cleaning out a corner of my sewing room and found this quilt stuffed in a laundry basket. I had totally forgotten it existed. I loved the top but hated the quilting I had put in it. My son saw it and asked if I had any plans for this quilt as he really liked it. Whoa... that was a surprise. So for a couple of days I debated whether to continue with the machine quilting I had done (just boring in the ditch) or should I take out all my quilting and send it off to my long arm gal, Cass. Well you can see from the following close ups I unsewed it and send it off and she did a wonderful job. I had no idea what color to do the quilting in and Cass choose a soft gray which really complements all the different fabrics.
Here are some of the light gold blocks from the center of the quilt -
and some of the rosy purples...
and some of the deep blues...
and the block that gives this quilt it's name...
This is fabric from the Millennium year 2000 - I'm glad I finally got this finished. It certainly made a lovely quilt in my opinion. My son says it looks like the quilt was custom made for his bedroom which is a deep blue. Since I started this quilt over a decade ago, this would make me quite prescient. Too bad I didn't have the vision to buy Apple stock too - LOL!
Thanks for stopping by and looking at my entry in the Bed Quilt category. I hope that all of you enjoy the Bloggers' Quilt Festival as much as I do. So many talented quilters who generously share their creativity.
Happy stitching-
carol fun
Monday, May 13, 2013
Fuzzy math on Design Wall Monday
Oh I am sooooo close to being finished making these nine patch blocks....
I sewed and counted and pressed and was sure I had enough but when I went to put them on my design wall I came up 4 short. It was late and I was too tired to plug the sewing machine back in so here is where I left it. I have a "formula" I'm following for this pattern - oh it is a new one from Thimbleblossoms called Niner - you can see it here. Anyway my "formula' has me making some blocks with cool corners and some with hot corners. Then as I follow the layout I alternate the hot and cool blocks.
My "formula" calls yellow, orange, red, and pink hot colors. Blue, green, turquoise and purple are cool colors. A problem I encountered is that lots of these Westminster prints combine hot and cool colors in one print. So sometimes the squares I cut were both hot and cool. I blame this for my fuzzy math which had me miscounting how many blocks I needed. It has nothing to do with my math skills - LOL -- oh it has everything to do with my math skills. I can never get a quilt to come out with the correct number of blocks without a lot of fudging and finagling.
Here are a couple of my favorite nine patch blocks -
I should be able to get the four blocks I still need made today. Then I'll play around with the arrangement. I can see places where there are too many lights in one spot - gotta spread them around. And, instead of putting this together as big blocks made up of 12 nine patches like the pattern calls for, I'm going to put this together in diagonal rows. Also, I'm cutting the outside setting triangles so I get straight of grain on the outside edges. I can't wait to get this one all sewn together and off to the long arm quilter. It makes me HAPPY!
Here's wishing you a week of happy sewing!
carol fun
I sewed and counted and pressed and was sure I had enough but when I went to put them on my design wall I came up 4 short. It was late and I was too tired to plug the sewing machine back in so here is where I left it. I have a "formula" I'm following for this pattern - oh it is a new one from Thimbleblossoms called Niner - you can see it here. Anyway my "formula' has me making some blocks with cool corners and some with hot corners. Then as I follow the layout I alternate the hot and cool blocks.
My "formula" calls yellow, orange, red, and pink hot colors. Blue, green, turquoise and purple are cool colors. A problem I encountered is that lots of these Westminster prints combine hot and cool colors in one print. So sometimes the squares I cut were both hot and cool. I blame this for my fuzzy math which had me miscounting how many blocks I needed. It has nothing to do with my math skills - LOL -- oh it has everything to do with my math skills. I can never get a quilt to come out with the correct number of blocks without a lot of fudging and finagling.
Here are a couple of my favorite nine patch blocks -
I should be able to get the four blocks I still need made today. Then I'll play around with the arrangement. I can see places where there are too many lights in one spot - gotta spread them around. And, instead of putting this together as big blocks made up of 12 nine patches like the pattern calls for, I'm going to put this together in diagonal rows. Also, I'm cutting the outside setting triangles so I get straight of grain on the outside edges. I can't wait to get this one all sewn together and off to the long arm quilter. It makes me HAPPY!
Here's wishing you a week of happy sewing!
carol fun
Thursday, May 9, 2013
Thoughts on Thursday
1. Nine patch blocks are fun to sew...I made 50!
2. The Thimbleblossoms Niner quilt needs 108 nine patch blocks so I'm almost half way done - yippie!
3. Sewing nine patch blocks gives you lots of time to think.
4. Sometimes you think strange thoughts - like - am I making the equivalent of the polyester double knit string quilt of my teenage years?
5. Oh no - this block makes me think that perhaps I am... must push this thought out of of my head.
6. I love color so why is it so hard to decide what color paint I want in my new house? Right now I'm leaning toward beige with white wood work in the living room. I always said there is too much beige in the world, but now I think it would be a nice neutral background for all my quilts.
7. I have decided that the kitchen and my studio will be yellow. I'm happy with that decision.
8. I need to sew more nine patch blocks and do some more thinking.
Happy stitching-
carol fun
| 50 Nine Patch Blocks |
2. The Thimbleblossoms Niner quilt needs 108 nine patch blocks so I'm almost half way done - yippie!
3. Sewing nine patch blocks gives you lots of time to think.
4. Sometimes you think strange thoughts - like - am I making the equivalent of the polyester double knit string quilt of my teenage years?
5. Oh no - this block makes me think that perhaps I am... must push this thought out of of my head.
6. I love color so why is it so hard to decide what color paint I want in my new house? Right now I'm leaning toward beige with white wood work in the living room. I always said there is too much beige in the world, but now I think it would be a nice neutral background for all my quilts.
7. I have decided that the kitchen and my studio will be yellow. I'm happy with that decision.
8. I need to sew more nine patch blocks and do some more thinking.
Happy stitching-
carol fun
Monday, May 6, 2013
Dithering with Kaffe on Design Wall Monday
Remember last Monday when I said the week was filling up fast - well - I totally underestimated how much there was to do. I ran around like the proverbial polka dot chicken with its head cut off - doctor's appointments, meetings with contractors, scouting trips to look at kitchen designs, shopping at IKEA, breakfast with friends, drop off quilts to Terry, drop Nick off at birthday party, pick Nick back up, etc, etc etc. My first chance to do anything stitchy didn't happen until Saturday evening and I made the most of my time.
Here is my design wall for this Monday -
and you can see that I totally dithered around with Kaffe fabrics and had a hard time deciding which quilt I want to work on next.
First off are these 4 Scrappy Trip blocks -
I'm thinking that this would benefit from more color order. I was able to get a ring of yellow fabrics, which was a total accident. But I think it would look better if I can get rings of the other colors too. I need to play with some graph paper to see if I can get this to work. I think it will because I'm doing a 7 x 7 square block, so I have 3 rows of fabric on each side of the dominant center row. Tune in later this week on this project.
And then there are these blocks -
another version of the Hourglass quilt from Kim Brackett's Scrap Basket Beauties book. This time I've paired the Kaffee/Westminster fabrics with a lime green Basic Grey Grunge fabric from Moda. I'm really liking this one.
And then there is BIG block -
this is a new pattern from Thimbleblossoms called Niner.
I downloaded this pdf Saturday night and jumped right in. You can purchase the pattern by clicking here. I'm very happy with the hot and cool colors of the fabrics. And that dotty yellow as the background makes my heart sing! It has orange dots and is a clear mottled yellow -- perfect! Here's a close-up -
I decided that since it needs 108 blocks, I would go ahead and cut out nine 2 1/2" squares from 108 different Kaffe Fassett/Brandon Mably/Phillip Jacobs fabrics - 54 hot fabrics and 54 cool fabrics.
I used my June Tailor Shape Cut Ruler and the cutting went quickly - much more quickly than folding the fabric and returning it to its plastic containment vessel!
So now I can sew together 9 patch blocks whenever I get a minute or two - here's hoping I get some minutes! LOL
Happy stitching-
carol fun
Here is my design wall for this Monday -
| Design Wall 5/6/13 |
and you can see that I totally dithered around with Kaffe fabrics and had a hard time deciding which quilt I want to work on next.
First off are these 4 Scrappy Trip blocks -
| Scrappy Trips |
I'm thinking that this would benefit from more color order. I was able to get a ring of yellow fabrics, which was a total accident. But I think it would look better if I can get rings of the other colors too. I need to play with some graph paper to see if I can get this to work. I think it will because I'm doing a 7 x 7 square block, so I have 3 rows of fabric on each side of the dominant center row. Tune in later this week on this project.
And then there are these blocks -
| Hourglass blocks |
another version of the Hourglass quilt from Kim Brackett's Scrap Basket Beauties book. This time I've paired the Kaffee/Westminster fabrics with a lime green Basic Grey Grunge fabric from Moda. I'm really liking this one.
And then there is BIG block -
| Niner by Thimbleblossoms |
this is a new pattern from Thimbleblossoms called Niner.
I downloaded this pdf Saturday night and jumped right in. You can purchase the pattern by clicking here. I'm very happy with the hot and cool colors of the fabrics. And that dotty yellow as the background makes my heart sing! It has orange dots and is a clear mottled yellow -- perfect! Here's a close-up -
I decided that since it needs 108 blocks, I would go ahead and cut out nine 2 1/2" squares from 108 different Kaffe Fassett/Brandon Mably/Phillip Jacobs fabrics - 54 hot fabrics and 54 cool fabrics.
| Approximately 972 squares! |
I used my June Tailor Shape Cut Ruler and the cutting went quickly - much more quickly than folding the fabric and returning it to its plastic containment vessel!
So now I can sew together 9 patch blocks whenever I get a minute or two - here's hoping I get some minutes! LOL
Happy stitching-
carol fun
Subscribe to:
Posts (Atom)